Overview of the Steedos Interface
Steedos Platform is designed to empower users with a suite of tools that streamline the creation, management, and optimization of business applications. With its user-friendly interface and robust features, Steedos Platform enables you to harness the power of low-code development to drive innovation and efficiency within your organization.
Overview
We are thrilled to have you on board and are committed to providing you with the tools and support you need to succeed. This user manual will guide you through the basics of the Steedos Platform, helping you get started with confidence and ease.
Let's embark on this journey together and unlock the full potential of low-code development with Steedos Platform!
Basic Concepts and Terminology
- Record: A record is a unit of information stored in Steedos, such as a customer, contact, or sales opportunity.
- Object: An object is a container for records, defining the structure and behavior of the records. Standard objects include "Account," "Contact," and "Opportunity," and users can also create custom objects.
- Field: A field is an attribute within an object, used to store specific information, such as a customer's name or address.
- List View: A list view is a collection of records that allows users to filter and view records based on specific criteria.
- Report: A report is an analysis and summary of Steedos data, which can be displayed as charts or tables.
- Dashboard: A dashboard is a set of visual reports used to present key metrics and trends at a glance.
Getting Started
Login and Navigation
To start using the Steedos Platform, users need to visit the specific URL provided by their company and log in using the assigned username and password. After logging in, users will see the main interface and can access different modules and functions through the navigation bar.
Personalizing the User Interface
Users can personalize the interface according to their preferences. This includes adjusting the home page layout, choosing items to display on the navigation bar, creating custom list views, etc.
Managing Personal Information and Settings
Users can manage their personal information and settings by clicking on the profile icon in the top right corner of the screen. Here, users can update personal information, change passwords, set language and time zone, manage email settings, and more.
User Interface Tour
Upon logging into Steedos Platform, you will be greeted with an intuitive homepage that provides quick access to the most important information, including tasks, recently viewed records, and custom components. The navigation bar is located at the top of the page, offering access to different modules and applications. On the left is the App Launcher, allowing you to easily switch and access different applications. The footer at the bottom of the page provides additional resources and help links.
Data Management
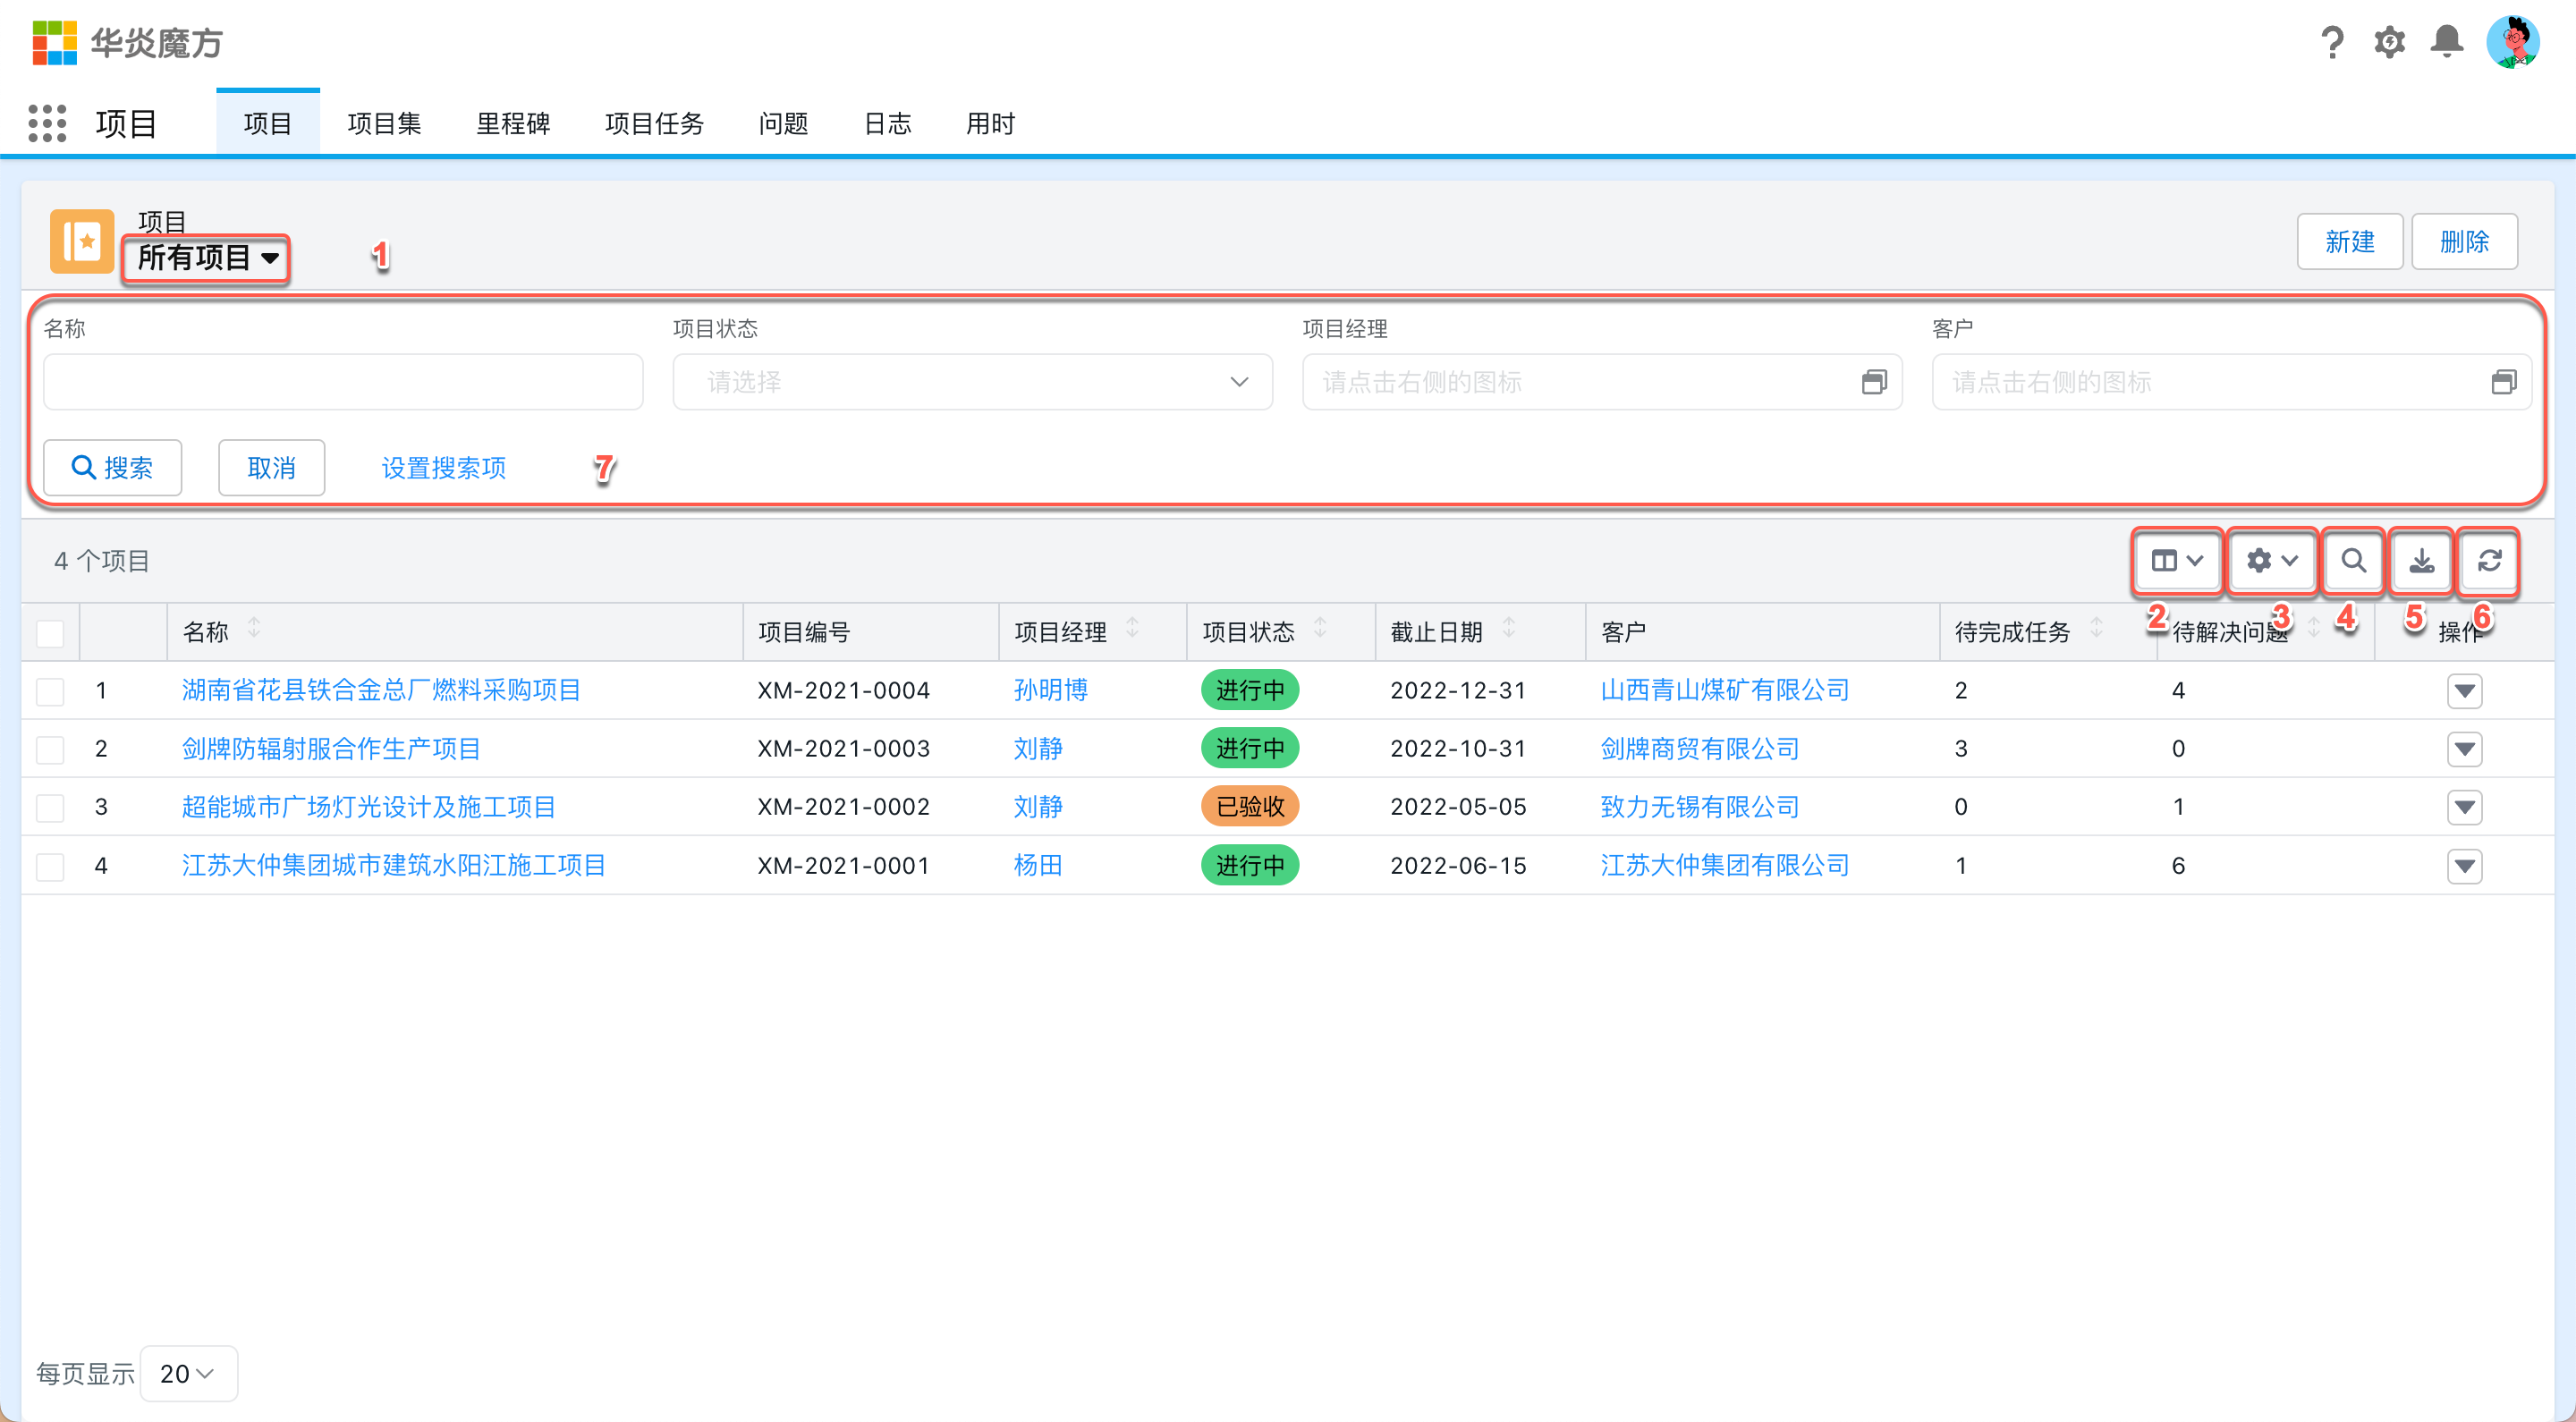
Browsing and Searching Records
Effectively browsing and searching records is a crucial part of daily work in the Steedos platform. Here is a detailed guide on how to browse and search records in Steedos:
Browsing Records
-
Accessing Objects: In Steedos, data is organized into different objects like "Contacts", "Accounts", and "Opportunities". To browse records of a specific object, select the respective object from the navigation menu.
-
Using List Views: Each object has one or more list views that display collections of records. You can use existing list views like "My Open Opportunities" or create custom views to display records that meet specific criteria.
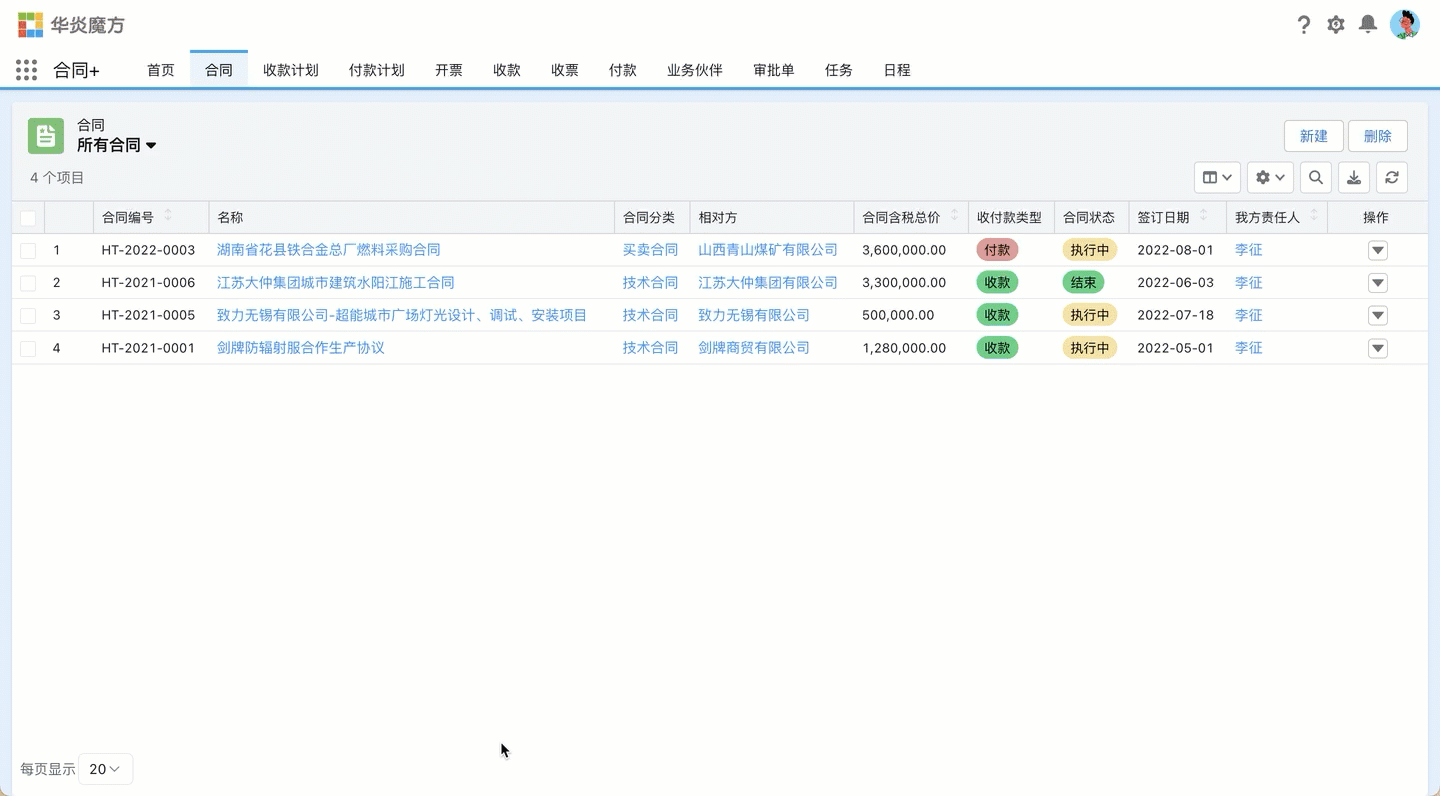
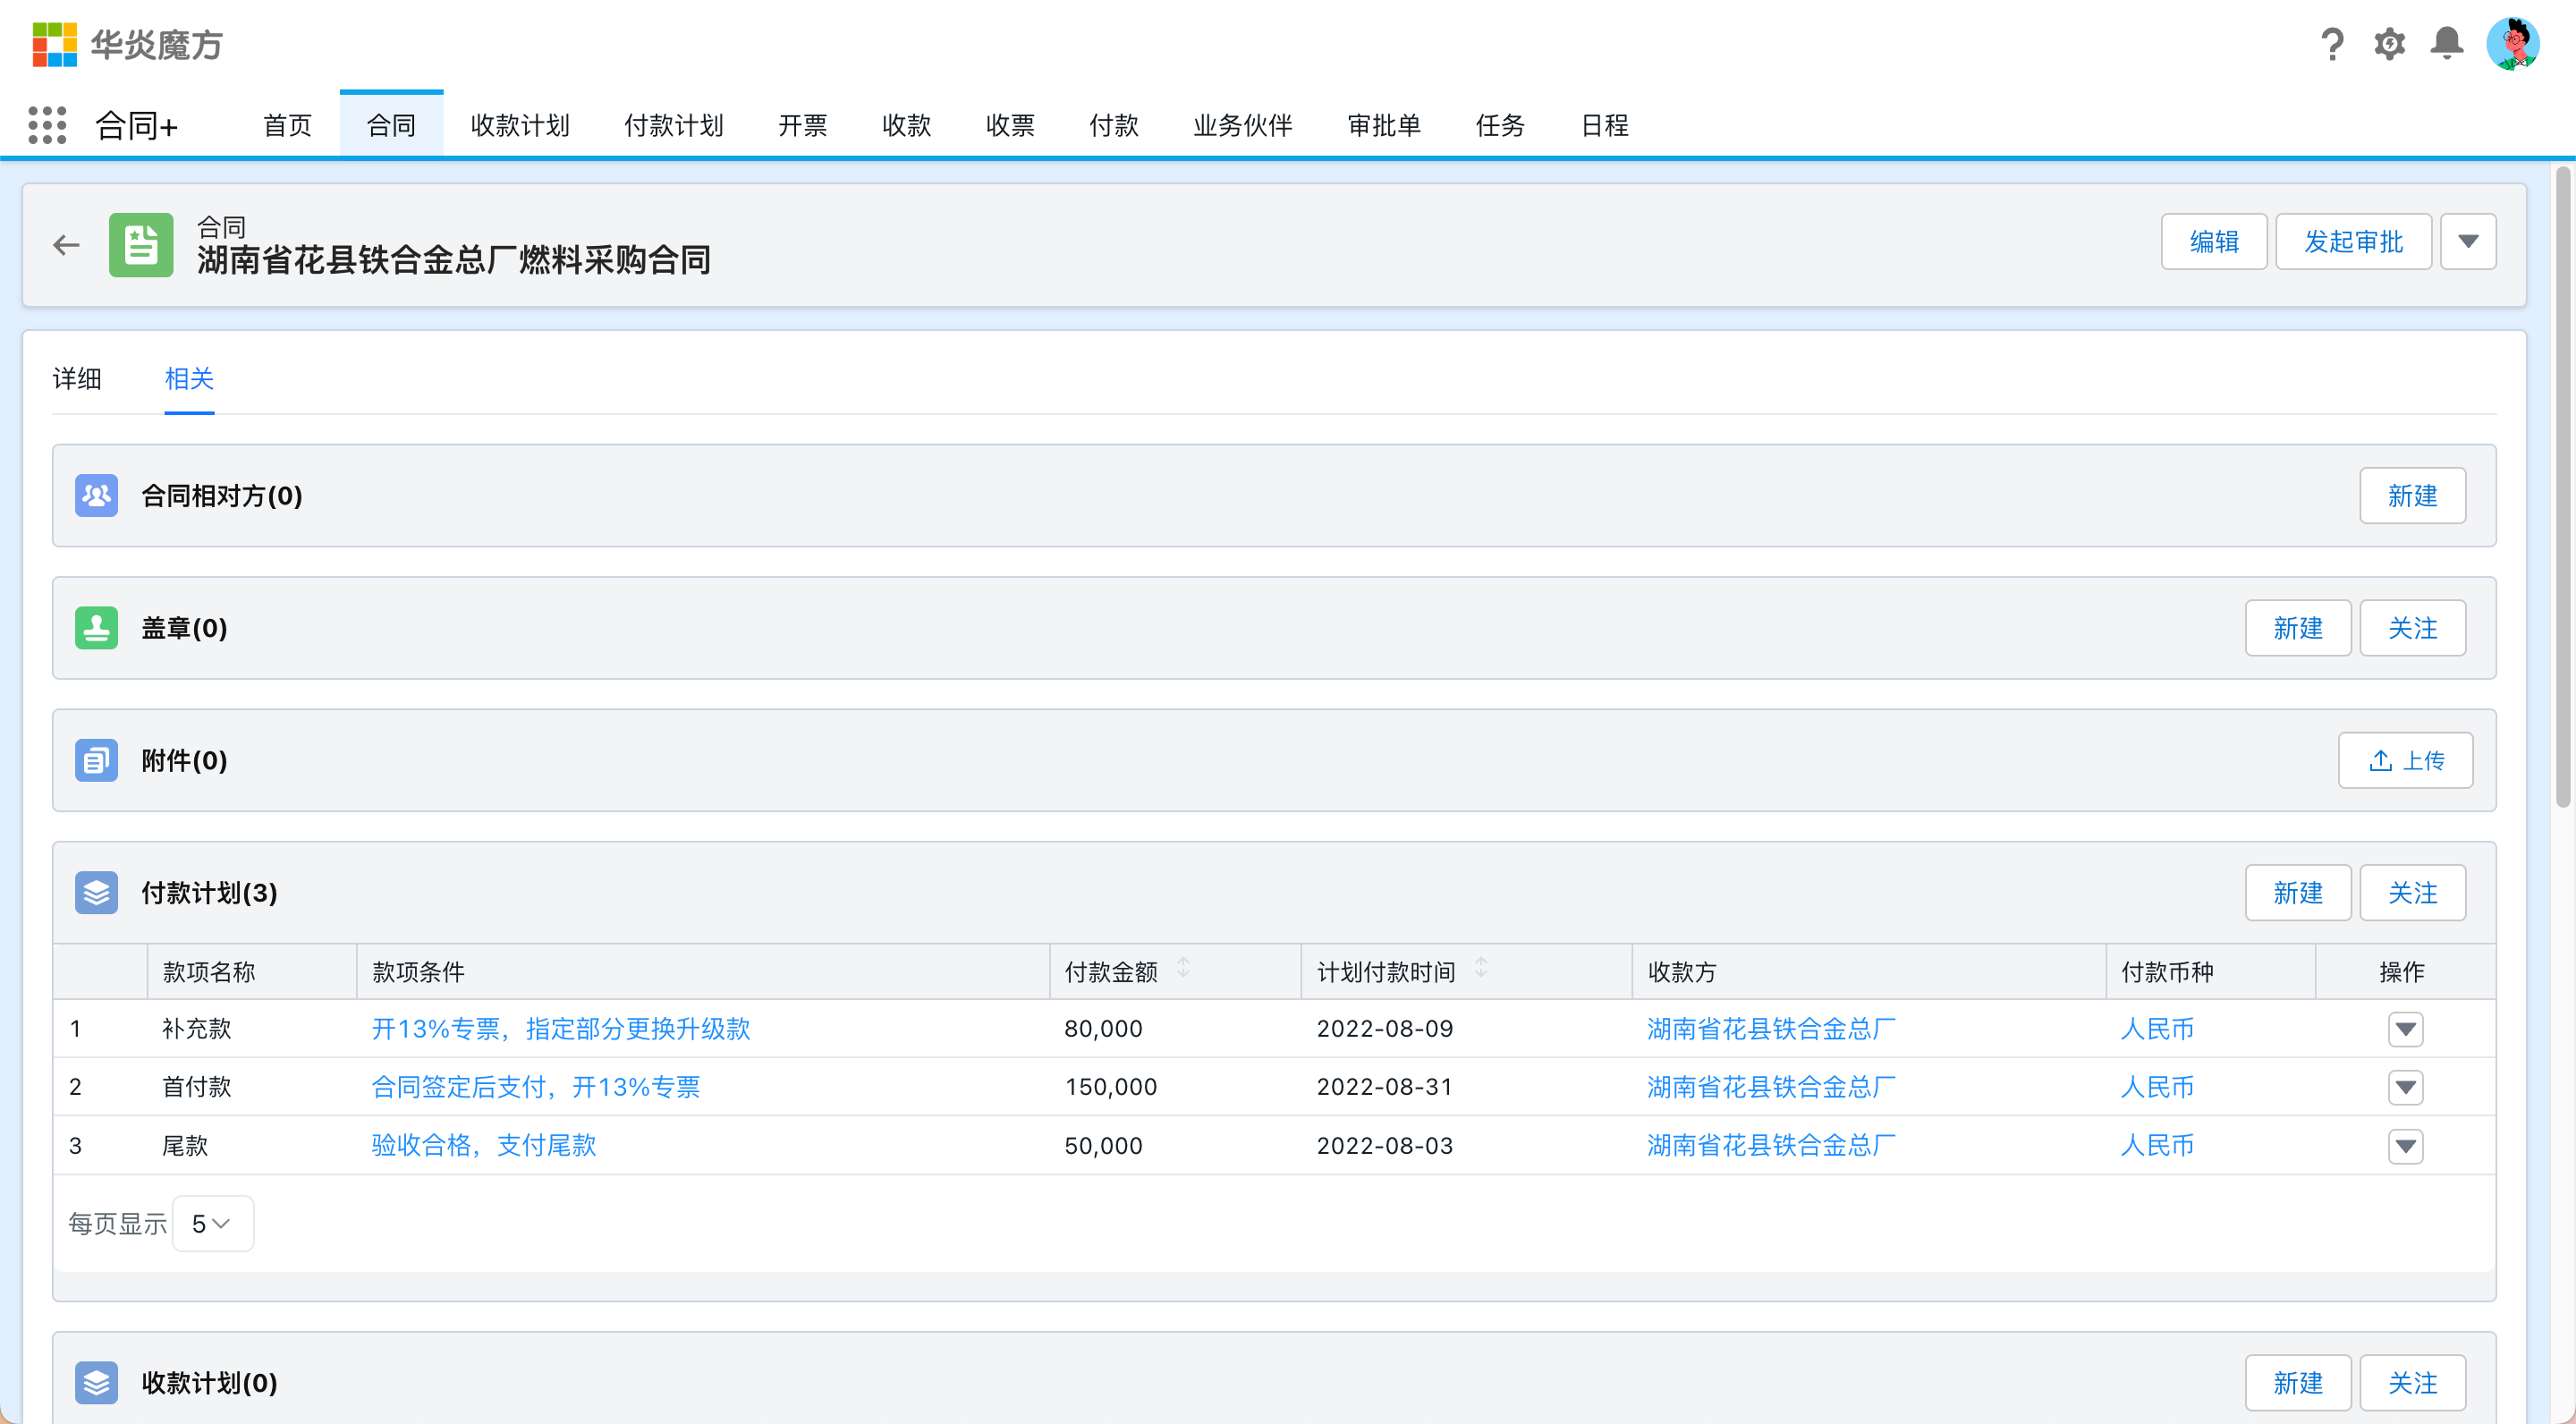
- Viewing Record Details: By clicking on the name of a record, you can view its detailed information. On the detail page, you can see all the relevant fields and other records associated with it.
Searching Records
-
Using Quick Search: Enter keywords in the search bar at the top of the page to quickly search the entire Steedos database. Global search returns all relevant records, including contacts, accounts, opportunities, etc.
-
Using Advanced Search: For more complex search needs, you can use the advanced search feature. This allows you to build detailed queries based on multiple criteria, such as finding all customers in a specific region with revenue exceeding a certain amount.
With these browsing and searching functionalities, Steedos users can quickly find the information they need, thus improving work efficiency and data management capabilities.

Record Creation and Management
In Steedos Platform, records are the fundamental units for storing information, such as customer details, sales opportunities, or service cases. Each record belongs to a specific object, which is analogous to a table in a database.
Creating Records
Creating a record is straightforward:
- Select the object where you want to add a record from the navigation menu.
- Click the "New" button on the object interface.
- Fill in the necessary information in the pop-up form.
- Click the "Save" button, and the new record will be added to the system.
Managing Records
Managing records is equally intuitive:
- Use the search bar to quickly find specific records.
- Refine search results with filters and sorting functions.
- Select records for editing or deletion.
- Batch operations allow you to perform actions on multiple records simultaneously, such as bulk deletion.
Attachments
If the attachment feature is enabled in object settings, users can add attachments to records.
Clicking "related" will show the attachment list of the current record.
- Multiple attachments can be added to a record.
- Attachments support version control, and the system will keep every version of the attachment for reference.
Field History
If the "Track Field History" feature is enabled in the object, the system will automatically record the modification history of data in fields. Once this feature is enabled, when displaying object records, if the current user has the "modifyAllRecords" permission for the current object, the "Related Field History" will also be displayed, allowing you to view the field modification history of this record. Users without the "modifyAllRecords" permission will not see the "Related Field History" records.
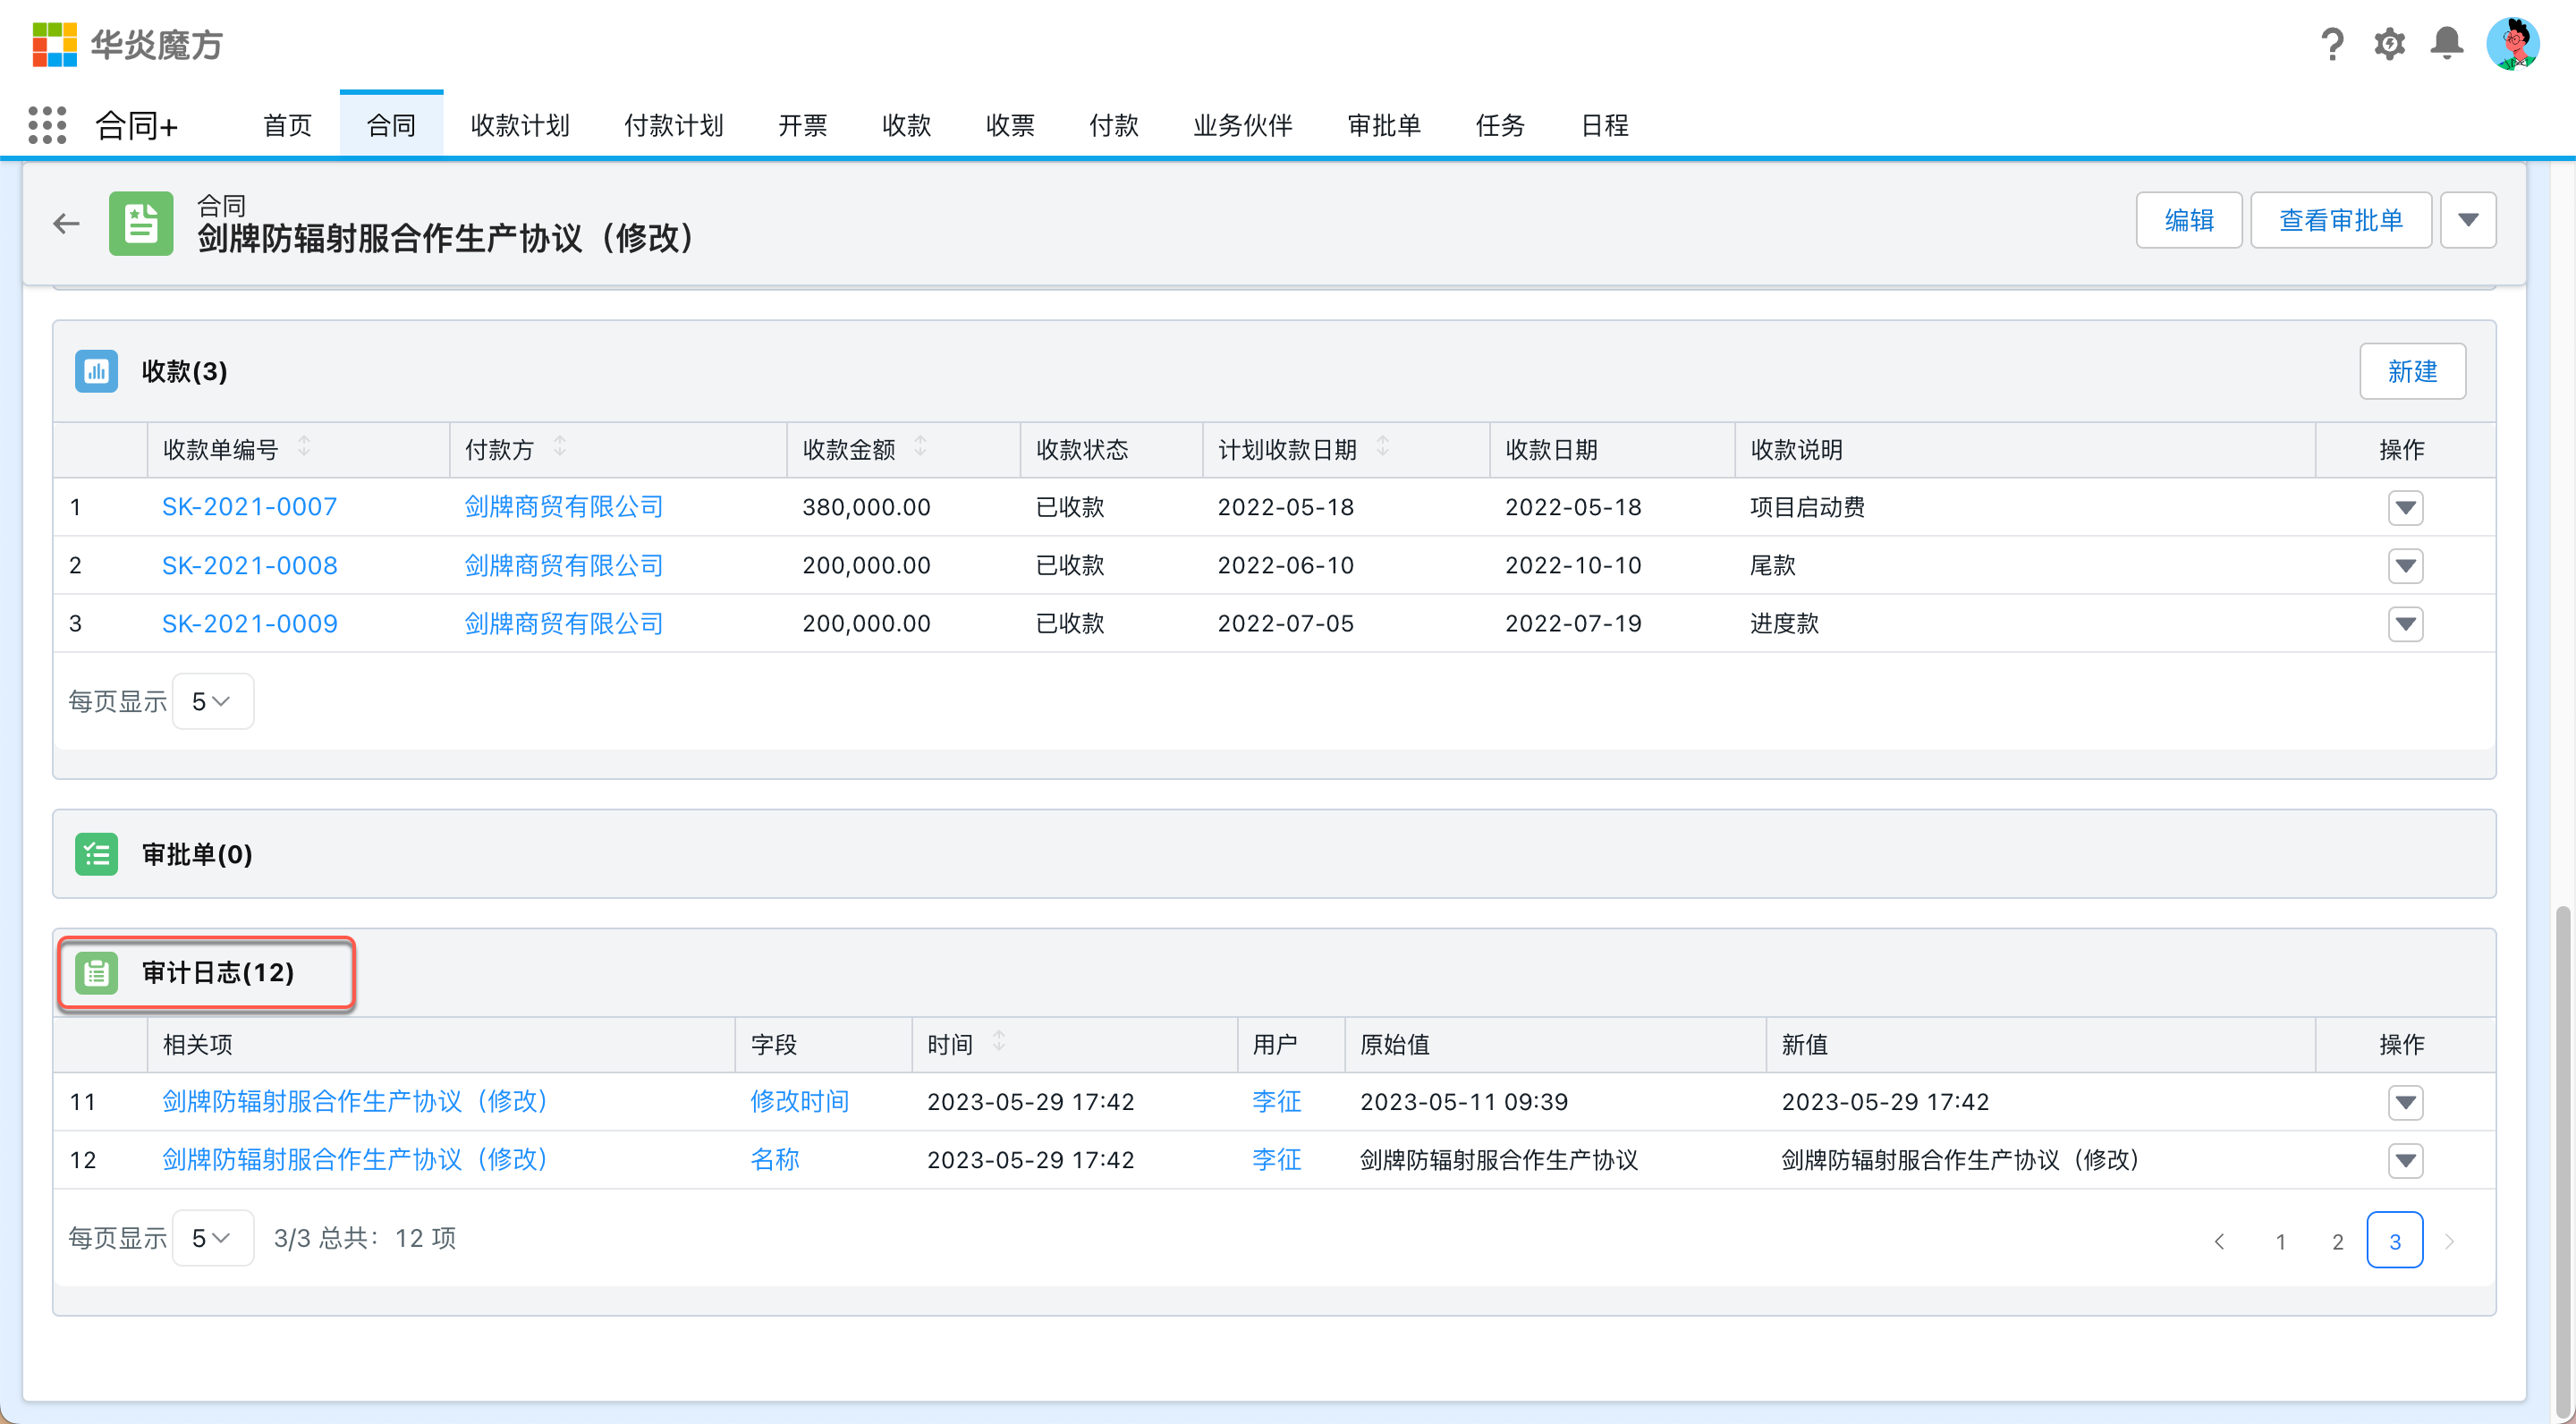
For system administrators or other users set with permission_sets = admin, in Settings - Advanced - Field History, you can see the field modification history records of all objects that have enabled "Track Field History".
Data Import and Export
Steedos Platform offers flexible data import and export capabilities to support bulk processing and migration of data.
Data Import
- Select the "Import" function on the object interface.
- Upload a CSV file and match the columns in the CSV file with the object fields.
- The system will validate the data and display a preview.
- Once confirmed, click "Import" to complete the bulk addition of data.
Data Export
- Select the "Export" function on the object interface.
- Choose the records you wish to export.
- Determine the fields and format for export.
- Click "Export" to save the records as a CSV file.
Calendars and Events
Steedos's calendar features help you stay organized and manage your time effectively. Whether you're scheduling meetings, tracking important deadlines, or coordinating with your team, Steedos's calendar tools are designed to keep you on track.
Creating and Managing Events
Scheduling Events
- Navigate to the "Calendar" tab in Steedos.
- Click on the "New Event" button or select a time slot directly on the calendar.
- Fill in the event details, including the subject, location, start and end times, and description.
- Set the event's visibility to control who can see it on your calendar.
Inviting Attendees
- In the event creation window, use the "Invitees" field to search and add attendees.
- Steedos will send an invitation email to all the attendees with the event details.
- Track RSVPs directly within the event record to see who has accepted, declined, or tentatively accepted the invitation.
Calendar Sharing
Sharing Your Calendar
- Go to your calendar settings and select "Share My Calendar."
- Choose the colleagues with whom you want to share your calendar and set their level of access (view only, view and edit, etc.).
- Shared calendars will appear in the colleagues' "Other Calendars" section.
Viewing Shared Calendars
- Access shared calendars from the "Other Calendars" dropdown menu.
- Overlay multiple calendars to find mutual availability for meetings.
- Respect privacy and access settings when viewing others' calendars.
Managing Recurring Events
Creating Recurring Events
- When creating an event, select the "Recurrence" option.
- Set the frequency (daily, weekly, monthly, etc.), recurrence pattern, and end date.
- Steedos will automatically create and update all instances of the recurring event.
Editing Recurring Events
- Edit a single instance of a recurring event or the entire series.
- Changes to the series will update all future instances of the event.
Best Practices for Calendar Management
- Regularly review and update your calendar to reflect your current availability.
- Set reminders for important events to ensure you're prepared and on time.
- Use descriptive titles and include detailed agendas in event descriptions to make meetings more productive.
By effectively utilizing Steedos's calendar and event features, you can enhance your time management, improve coordination with your team, and ensure that you never miss an important engagement.
Task Management
Steedos provides robust tools for managing tasks and activities, helping you keep track of your to-dos, follow-ups, and interactions with customers. These tools are essential for staying organized and ensuring that nothing falls through the cracks.
Creating and Assigning Tasks
Creating Tasks
- Navigate to the "Tasks" tab or a specific record (like a contact or opportunity) where you want to create a task.
- Click on the "New Task" button.
- Fill in the task details, including the subject, due date, priority, and related records.
- Set reminders to receive notifications before the task is due.
Assigning Tasks to Others
- In the task creation window, use the "Assigned To" field to select a colleague.
- The assignee will receive a notification about the new task.
- Monitor the progress and completion of assigned tasks in the "Activity Timeline."
Task Lists and Views
Using Task Lists
- Access your task list from the "Tasks" tab to see all your tasks in one place.
- Use the "My Tasks" view to focus on tasks assigned to you.
Customizing List Views
- Create custom list views to organize tasks by criteria like due date, priority, or related record.
- Share custom views with your team for collaborative task management.
Task Automation
Creating Automated Tasks
- Use Steedos's automation tools (like Process Builder or Workflow Rules) to create tasks automatically based on specific triggers.
- Set up automated follow-up tasks when a deal is closed or a case is resolved.
Task Notifications
- Configure task notifications to alert you via email, mobile when a task is assigned, updated, or due.
Best Practices for Task Management
- Regularly review and update your tasks to reflect current priorities.
- Break down complex tasks into smaller, actionable steps.
- Use task descriptions to provide detailed instructions and context.
By effectively managing tasks and activities within Steedos, you can ensure that you're always on top of your responsibilities, providing timely follow-ups, and delivering exceptional customer experiences.
Managing Files and Documents
Steedos offers a comprehensive suite of tools for managing files and documents, ensuring that your team can easily store, access, and collaborate on important files. Here's how you can make the most of these features:
Uploading Files
Uploading Files
- Navigate to the "Files" tab or a specific record where you want to upload the file.
- Click on "Upload Files" or drag and drop the file into the designated area.
- Once uploaded, you can add descriptions and tags for easier searching.
Version Control
Managing Versions
- When uploading a new version of a file, select "Upload New Version" from the file's dropdown menu.
- View the version history to track changes and revert to previous versions if necessary.

